Powered by Blogger.

Pages

  • Home
  • Makeup
  • Hair
  • Lifestyle
  • Reviews
  • DIY
  • Contact Me
Facebook Instagram Twitter Pinterest Tumblr

Wrens World


Choosing the proper cosmetics can be hard and confusing but is completely worth it in the end. The right cosmetics can take you from being borderline Oompa Loompa or chimney sweep to the true beauty you are. First you need to know the different products, what they are for, and where to apply them. But before you get to applying anything, you need to find your skin tone which is key to not looking like an Oompa Loompa or chimney sweep. Once you find you skin tone and get an understanding of the basic face products, the rest is easy. This all may be a bit confusing or hard but it’s worth it.

First, a brief background on the products that will be discussed, foundation, blush, bronzer, and eyeshadow. Foundation is most commonly found in liquid or cream form and is applied to the entire face. It’s purpose is to even out the skin and blur any imperfections. Then there is blush, also know rouge, which is applied to the apples of the cheeks (the chubby circular part emphasized when you smile) to warm up the face and give a natural glow or flush. Now for contouring. Contour can be liquid but is more commonly a pressed powder or cream that is two to three shades darker than your skin and is applied to the hallows of the cheeks to give a more sculpted appearance. To find the area to apply contour, suck your cheeks in making a fish face, the part sucked in is where contour should be applied. Eyeshadow is most commonly a pressed powder but you can also get it as a cream or loose powder and is applied to the eyelids to enhance your natural eye shape and color. Combine all of these together properly and you’ll be a show stopper.

No onto the most important part, what the different skin tones look like and how to find which one you are. The three different skin tones are cool, neutral, and warm. Cool tones are pink based, warm tones are yellow based, and neutral tones are in between. Now, how to find which you are. The first, and simplest, test is to just stand in front of a mirror, look at your skin and see if you have more pink undertones or yellow undertones. If you’re more pink then you’re likely cool but if you have more yellow undertones then you’re more likely warm. Sometime holding up a blank piece of white paper will help because you can compare your skin to the stark white paper and see if you’re more pink (cool) or yellow (warm). Not many people can tell from just looking at their skin so there’s the vein test. Look at the veins running down your arm. If they look very blue you're cool, while very green looking veins are warm, and then teal looking veins are neutral. Hopefully you’ve figured out which you are but if you’re still not sure, try warm skin toned products (they tend to be more flattering) but if you look too yellow then you’ll know you’re cool toned. Your skin tone is what you base all of your face products off of which is why it’s so important.

Now for the fun part, choosing new makeup that will enhance your natural beauty but also fits your skin tone. For foundation you want it to blur imperfections and smooth out any unevenness your skin may have so choose on that is the same as your skin tone. As for blush you want to choose the opposite. If your skin is already pink from being cool or yellow from being warm you don’t want to draw focus or add to it. Good colors for cool toned people are peaches or anything orange based while pinks and purples are best if you’re warm. If you’re neutral you’re lucky and can where whatever color you want. Contour is like foundation, you want to choose the same as your skin tone but two to three shades darker than your skin. If you’re cool you’ll want on that has a grey undertone. Using a bronzer or contour that is too warm can make it look like you have orange streaks on your face. If you’re warm toned then you’ll want the bronzers and orange based contour. When a warm toned person uses a cool toned contour it will be very grey, giving a dirty or even sickly appearance to the skin. If you’re neutral, you get to choose which you prefer, just make sure it all goes together. So to summarize, foundations and contours should be the same as your skin tone while blushes should be the opposite.

Now that you’ve got the face mastered we can learn how to make your eyes stand out. Choosing eye shadows that will make you eyes pop is like choosing blush, you want to use the color opposite your eye color or the color wheel. So if your eyes are blue, use orange, peach or even an orange based gold. Red is opposite green so try using red, pink, or even violet shades. Brown eyed people are lucky like neutral skin toned people because you can use any color you want. These are just how to make you eye color stand out more but you can rock whatever colors you like.


So now you’ve learned it all. From finding your skin tone, the correct products to use, why it’s all important, and how to make your eye color stand out. No one wants to look like an Oompa Loompa or chimney sweep and now you have the knowledge to not only avoid it but also change it if you hadn’t been using the correct products. Choosing the correct makeup products might be hard, confusing, or even intimidating, especially if you’re new to makeup, but it’s worth it to enhance your natural, beautiful self.
Share
Tweet
Pin
Share
No comments

a Rafflecopter giveaway

Giveaway will close January 1, 2016 at 12am central time

Rules:
You MUST be 18 years of age or older OR have parent permission
You MUST be a subscriber to THIS channel
Open to the 48 Contiguous United States ONLY (sorry)
Additional entries are OPTIONAL

To see the products better, check out the video I have for this giveaway!


Share
Tweet
Pin
Share
1 comments


Above is my most recent YouTube video. I show you my most recent go to makeup look. It's super simple, easy, and moderately natural (a bit bold but using neutral colors for the eyes) For a more detailed, step-by-step tutorial with close up product shots and swatches keep reading!


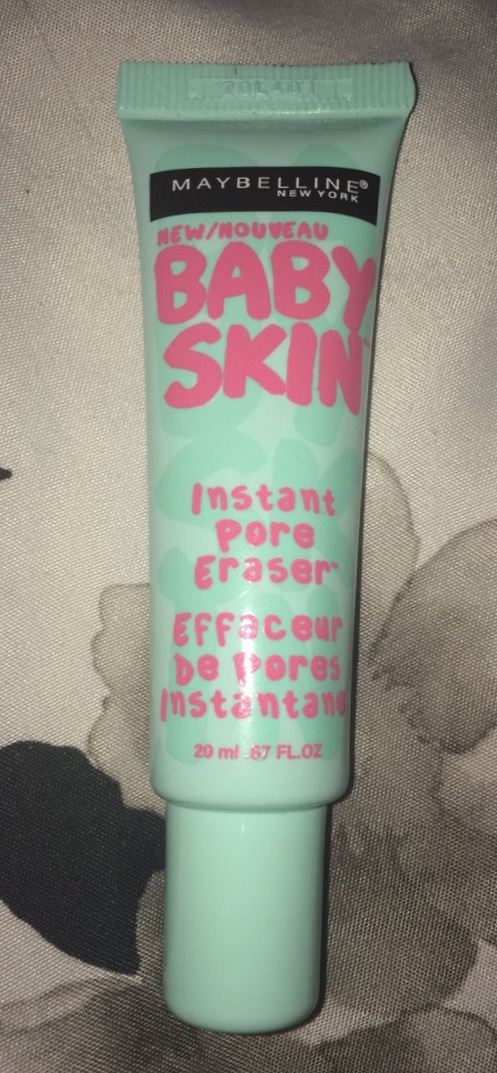
To start off I used my 'Baby Skin' face primer from Maybelline New York. With a small amount, I used my finger tips to apply it all over my face so that the rest of my makeup has a nice base to start with. I've used this a few times and I don't really like it. I have quite large pores and it does nothing for them. Am I supposed to let it set or something? A lot of over beauty gurus have used this and love it but I guess I'll just have to continue on my search for something to minimize my pores. Maybe I need to change my skin care routine to focus on my pores more? If you have any product suggestion, makeup or skin care, PLEASE let me know! 


I next apply my Maybelline 'Fit Me' concealer in 15 Fair in a triangular shape under my eyes to cover any dark circles. This shade is really great because it's close enough to my skin shade that it doesn't highlight much so it can still be used on spots!


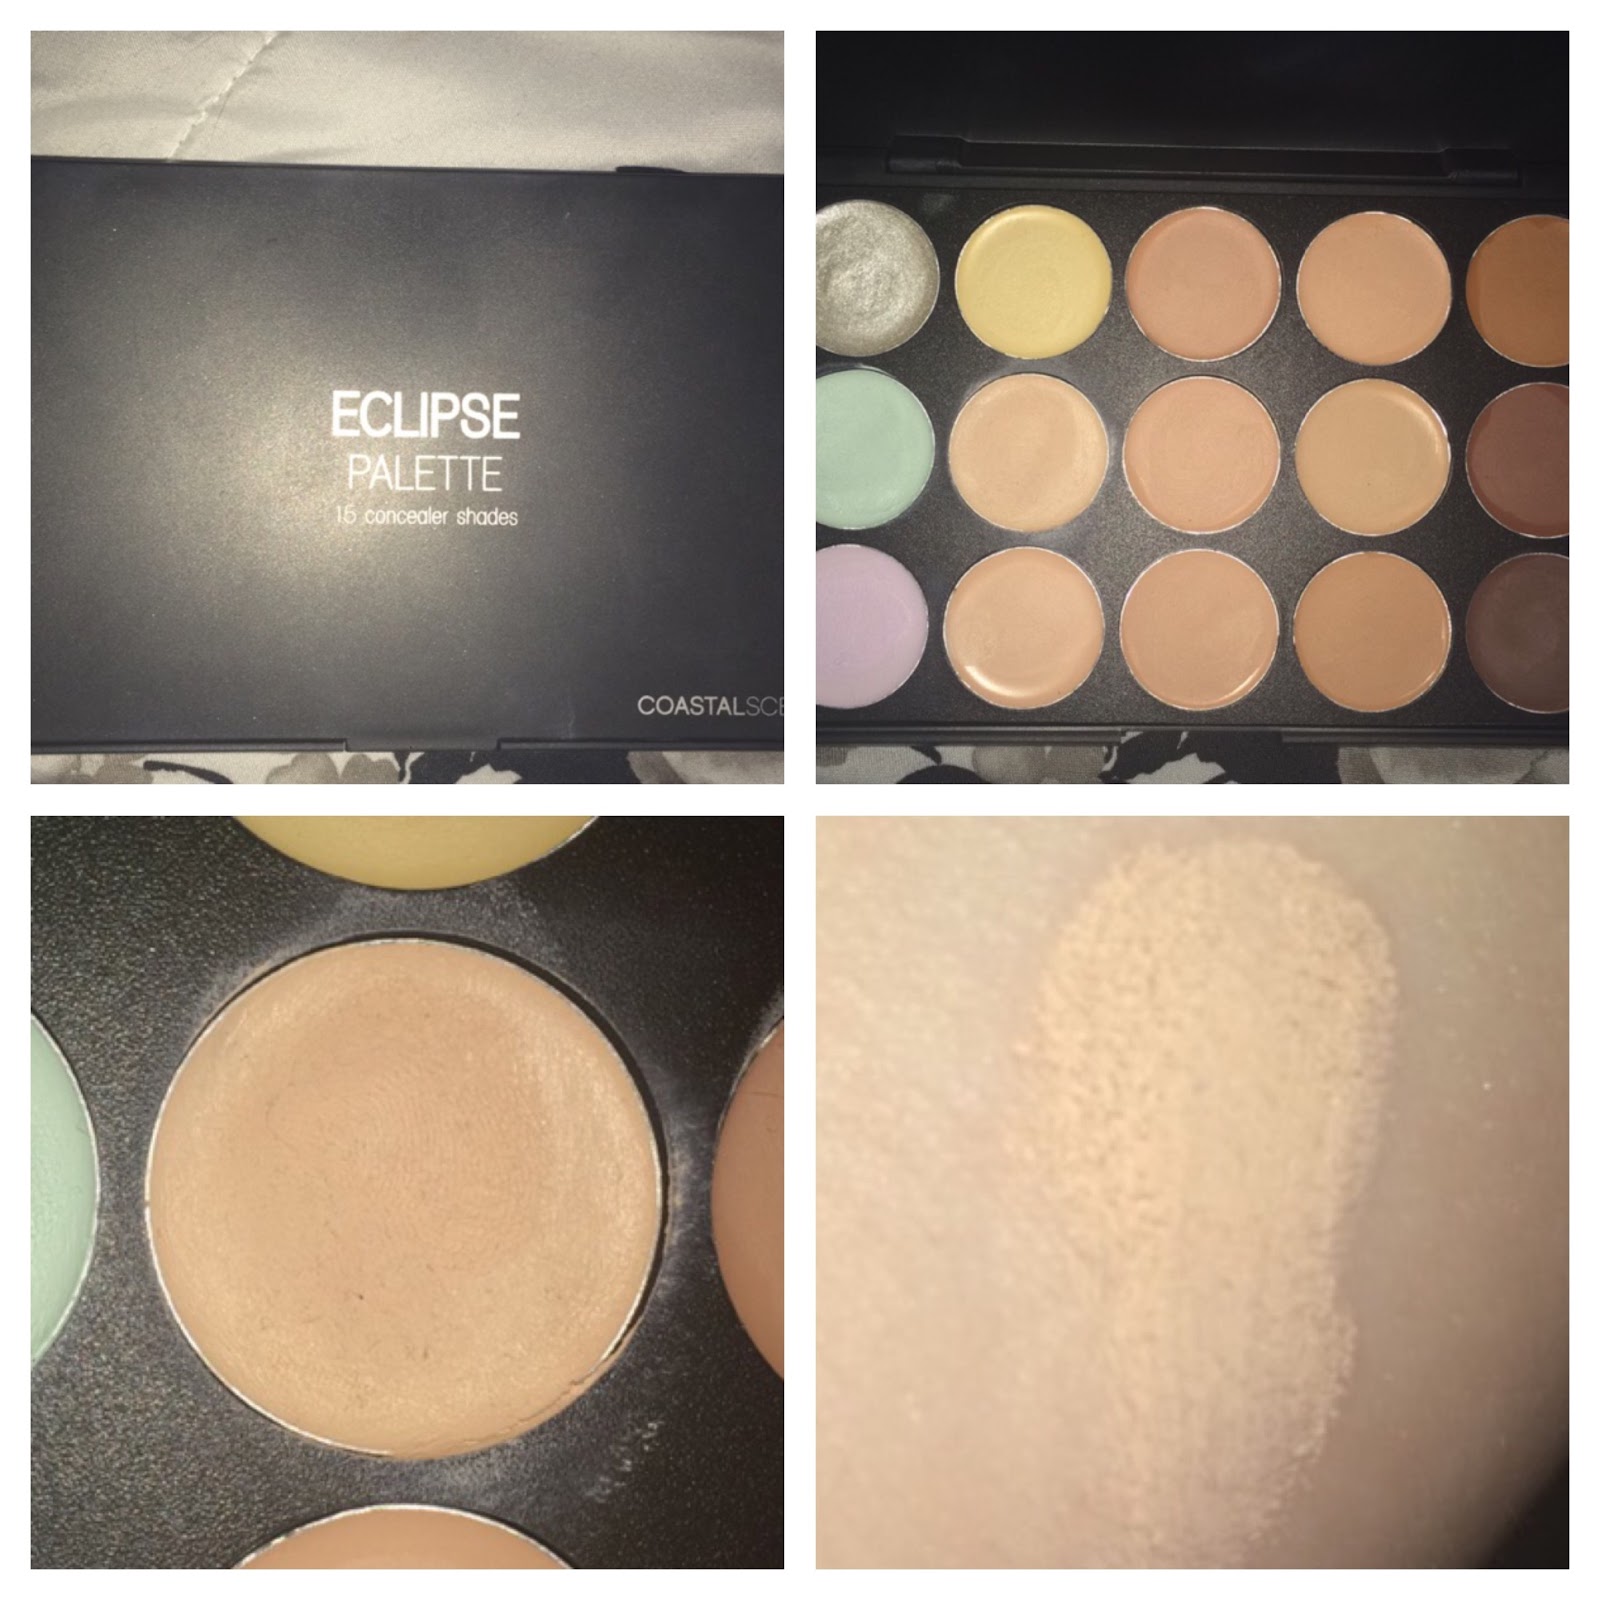
My skin likes to be nice and red, especially around my nose, so to cover it up I turn to my Coastal Scents 'Eclipse Palette' and use the green shade. Green is opposite red on the color wheel so they cancel each other out. I apply this all around my nose and a bit on my chin since I get a bit red there sometimes too. I lightly blended them together with my fingertips but then brought in my Sigma F80 Flat Kabuki brush to blend it even more and better. Then I go back to my Maybelline 'Fit Me' Concealer in 15 Fair to highlight a bit down the bridge of my nose, cheekbones, and forehead and then use my F80 to blend those in a bit.


Heading back to my trusty 'Eclipse Palette' from Coastal Scents, I use the darkest shade to contour. I slowly apply little by little in the hollows of my cheeks, the sides of my nose, around my temples, and at my hairline. You don't want to apply too much if you're super pale like me so that's why I take a while and apply a small amount and build it up. To apply it I used my Sigma F75 Concealer brush. It's the perfect size for me, not too big, but not too small. I also go back in with my Maybelline 'Fit Me' concealer on the sides of my nose and down the bridge because I blended it out a bit too far but its an easy fix. Just add a bit of the 'Fit Me' concealer and blend it out to get the perfect contour.


To set and deepen the contour, I go in with my NYC 'Smooth Skin Bronzer' in Sunny on my Sigma F05 Small Contour brush. I absolutely LOVE this brush! It is so perfect for contouring. It fits in the hollows of my cheeks so well and it's small size lets you contour your nose and around your face all in one brush! Anywho, I used this everywhere I put the dark cream concealer and also on my jawline.


I honestly don't know what I did without this blush. It is my go to, number one blush from NYX called 'Bourgeois Pig'.  I have others but this is ALWAYS the one I grab. It's so pigmented but very build-able. If you use it lightly, like I show in the swatch above, it's a nice natural flush of color. Whereas if you apply it a bit more heavily you'll get a more dramatic affect. For this particular look I lightly applied it with my Sigma F10 Powder/Blush brush. I apply my blush from the apples of my cheeks back to my hairline. I don't like the look of blush when it's just on the apples of the cheeks.


To set the rest of my face, and tone down the blush that I applied a bit too heavily, I use my Rimmel 'Stay Matte' Pressed Powder in 003 Natural. To apply it I use my Sigma F30 Large Powder brush. I swirl the brush around in the product and then lightly press in onto my face and then blend it out.


To highlight I've been using this amazing backed eyeshadow from Klean Color called 'Pearl'. It's the perfect silvery white color. Most actual face highlighters are either pink or yellow toned but I don't like how those look on me personally. I apply this with my e.l.f. Fan Brush along my cheekbones, down the bridge of my nose, a bit on the forehead and chin, and on my cupid's bow.


To lightly fill in my brows I used my 'Brows Now!' by Hard Candy in medium/dark. I ran the product through both of my brows to add a bit of color and to fill in sparse areas. I was going for a natural brow, plus I'm almost out, so I didn't apply a ton, just enough to boost the look. This product is really cool because it has little fibers in it that help give you brows a fuller look and feel.


To give the eyeshadows a good base, I use a small amount of Hard Candy's Eye Shadow Primer called "Eyes The Limit." I've used this for a while and it's pretty good. It keeps the eye shadow in place all day, plus it's only $6. Unfortunately, you can only get Hard Candy at Walmart.


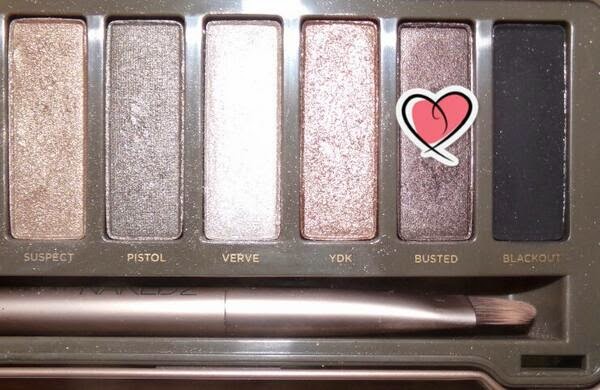
Using my Sigma E55 Eye Shading brush, I applied Last Sin from the Urban Decay Vice 3 palette all over the lid. The photos make it look a bit yellow/orange toned but it's a more of a creamy nude.


Next, I take DTF on my Sigma E25 Blending brush and apply it through my crease and outer 'v'. DTF is what I would call a semi-matte finish. It's matte with small flecks of glitter/shimmer. It's not pure shimmer or pure matte. It looks really shimmery in the pan but when you look at the swatch you can see that the glitter/shimmer doesn't transfer. Then I go back with Last Sin on the center of my lid with my finger to bring back some of the color that was lost from adding DTF.


To add depth to the outer 'v' I use Defy on my Sigma E45 Small Tapered Blending brush. I don't blend it out, I just pat it on.


I next take Truth on my Sigma E35 Tapered Blending brush. I start by running it across my brow bone as a highlight and then use it to blend out DTF and Defy. It's very close to my skin color, just a bit more pink toned. I don't use much so that it doesn't lighten the other colors.


Going back to Defy, I use my Sigma E30 Pencil brush to smoke out the bottom lash line. I start by first adding a bit more to the upper lids outer 'v' and then bring it down onto the outermost part of the lower lid. I pull the color inward from so that it creates a gradient effect.

I don't have a picture of what I used next, mainly because it was a sample but also because you can barely read the writing on it. I applied Mary Kay's Ultimate Mascara in black on my top lashes only.


I always use multiple mascaras so next I take Wet 'n Wild's Mega Volume in black on my top and bottom lashes. I used to use this a couple years ago and LOVED it so I recently repurchased it since I was in need of a new mascara, plus it's only $3. Some people don't like it and they've said it didn't do much for their lashes. I have naturally long lashes so it works great on me. If you've ever used this let me know what you thought of it, I'd love to know.


When I repurchased the Mega Volume I saw Wet 'n Wild's Max Volume Plus in black and decided to give it a go. I applied it to my top and bottom lashes. I'm not sure how I feel about this yet.


Taking my baked eye shadow in Pearl from Klean Color on my Sigma E30 Pencil brush and applied it to the inner corner to highlight and brighten.


Now finally on to the lips! I take a tiny amount of my Nivea Lip Butter in Raspberry Rose Kiss on my finger and rub it in to moisturize and soften my lips in preparation for the lipstick.


Taking Klean Colors Kleanista lipstick called 'Cast of Spell' I apply it straight from the tube all over my lips.


Next I take Revlon's 'Cocoa Craving' and Wet 'n Wild's 'Pagan Angel' from their Fergie line on my Sigma E05 Eyeliner brush. I add a tiny amount at a time and blend them together to create the final look.


Heading back to my 'Eclipse Palette' from Coastal Scents, I take the lightest skin color on my Sigma F70 Concealer brush and use it to clean up the edges around my lips to give it a sharp, clean look.

And that's it! We're finally done. I hope you enjoy this look. I love the lip combo I created and the eye look is a great look for any and every one. Let me know what you think of this look and what you'd like to see next! I love to hear your opinions :)


xoxo,
Wren
Share
Tweet
Pin
Share
No comments


Have you always wanted to try Lime Crime, Jeffree Star Cosmetics, Sugar Pill, Manic Panic, and so many more makeup brands but don't want to pay full price? Head on over to http://www.dollskill.com/  They sell authentic makeup and beauty products from these brands and more on their website. When you use the code SHODDYSCULT you get 5% off! Yeah, it's not a lot but when you're buying $20 lippies anything helps! I just placed an order with them so I can vouch that it works. My total was $94 but with the code it reduced it to $85.30 (that's $8.30 off!) Plus if you spend $75 you get free shipping. So go stock up on your favorite products or try something new! Brands like Lime Crime and Jeffree Star don't really ever have sales and if they do it's not much and only around the holidays. The only down fall is that they don't have ever single shade or product but I'm sure you can find at least a few things you've been wanting or needing. Plus by going through Dolls Kill you can find various discount codes throughout the year and don't have to wait for something like Black Friday and Cyber Monday.  I'm not sure how long this code will be active so definitely place your order as soon as possible to ensure you get the discount! I hope you found this helpful and I hope you enjoy your new products at a nice discounted price ;) After some time wearing them I'll do a review too. Also, stay tuned for an unboxing with swatches!

xoxo,
Wren
Share
Tweet
Pin
Share
No comments

What's Up Guys?!
Okay, so to start off I'd like to emphasize that this
is an INSPIRED 1930's Flapper look. It's not an actual
recreation of the look that women wore back then. It's
what I like to call my modern day take on it. Plus, this 
look is much more wear able than the "real thing" and
can be worn for special events, a night out with your 
significant other, to Prom, or even just on a day you 
feel like being a little bold and daring. Also, I'd like to
say that this isn't a step by step tutorial that shows you
everything. It's more of an overview of the products
with a description of how I used/applied them. If it's
at all confusing or your not sure how to do 
something, refer to the video below.

Video:


Products Used:

Hard Candy-
All Lid Up Cream Eyeshadow
in Stepping Stones

Wet n' Wild-
Color Icon Trio
Silent Era Film

Rimmel London-
Gel Eyeliner & 
Kohl Pencil Liner
(black)

Sally Hanson-
Eyelash Curler

Jordana-
Best Lash Extreme
Volumizing Mascara
(black)

Rimmel London-
Match Perfection 
Concealer/Highlighter
125 & 230

e.l.f.-
Concealer
Ivory

e.l.f.- 
Contouring 
Blush & Bronzer
St. Lucia

Flower Beauty-
Cream Blush
Pure Petunia

Revlon-
Color Burst Matte Balm
Standout

Kiss-
Lip Gloss
Hot Red

Rimmel London-
Airy Fairy Lipstick

NYX-
Butter Gloss
Vanilla Creme Pie


Left-Right: Wet n' Wild trio, Hard Candy
Cream Eyeshadow

Step One: Eyes
Starting with the Hard Candy cream eyeshadow, apply
it to your entire eyelid. Then, with a flat eyeshadow brush
pack on the charcoal grey eyeshadow all over the lid where
we applied the cream eyeshadow base. Next, with a clean 
fluffy eyeshadow brush, put the orangey brownish color in
the outer "v" of your eye and then into the crease. With the
lightest taupe grey color on your finger, apply it to the inner
corners of your eyes and up on the brow bone. Then, take
that same lightest color on a fluffy blending brush with just
a tiny little bit of product, blend everything together to make
it look nice and seamless. Going back to the charcoal grey,
pack it back on since some intensity may have been lost
due to the blending. With the gel eyeliner, line your upper 
lashes as close to the lash line as possible. Take it down onto
your lower lash line and just put the product on the outer most
part of your eyes and with your finger blend the color across
the rest of the area. Then with a kohl eyeliner pencil, line your
tight line to make sure there is no pinky flesh tones peeking
through. Then going back to the charcoal grey again, take
some on the tip of a brush and run it over your lower lash line
to smoke it out and make it a little more sexy. Finally, to finish
off the eyes, curl your lashes and apply a few coats of your
favorite mascara and even add some falsies if you want.


Left-Right: Flower Beauty Blush, e.l.f blush and bronzer
e.l.f. concealer, Rimmel London Match Perfection concealers


Step Two:
For the face I started off by first clean up any eyeshadow
fallout and then took the e.l.f. concealer and used it under my
eyes to help cancel out any blue tones. Then with the lighter of
the Rimmel concealers, I put this anywhere that I wanted to 
highlight or brighten. (Under the eyes, down the nose, cupid's bow... etc.)
After that I put the darker one on any areas that I want to actually
cover and conceal. (anywhere that I have redness, over a blemish... etc.)
 With a sponge or your fingers, blend everything out. Next, take the
 cream blush on your fingers, apply it to your cheeks and blend 
it out with either your fingers or the other end of the sponge. 
Then with the e.l.f. blush and bronzer, take the blush on a brush and 
apply it where we put the cream blush to add a bit of shimmer to 
make the face look healthy and glowing. To add some warmth, 
take a little bit (emphasis on little if your pale like me) of the bronzer and
but it in the hollows of your cheeks, around the forehead, 
down the sides of the nose, and around your jaw.


Left-Right: Revlon Colorburst Matte Balm, Kiss Lip Gloss
Rimmel Airy Fairy Lipstick, NYX Butter Goss

Step Three:
To finish things off,  take your favorite dark blue-toned
red lip color and put it all over the lips. If you want your lips 
to be nice and shinny add a dark blood red lip gloss. Using 
the darker lip option will be accurate to the era but if you plan
on just wearing it out for a date night or even to Prom and want
a lip that's not so bold, I suggest a pinky nude. Rimmel's Airy
Fairy Lipstick and NYX Butter Gloss in Vanilla Creme Pie
is the PERFECT combination if you want a pinky nude.


Pictures of Completed Look:


That's It!

I hope that this was helpful if you were look for a more wearable
1930's Flapper makeup look! Comment down below where you plan
on wearing this look to! I would love to know :) Also, don't forget to
follow me so you can see my next post! It means so much to me.


xoxo,
Wren
Share
Tweet
Pin
Share
No comments

Hey Everyone!
Today I'm going to be showing you how to create
this gorgeous look that's sweat-proof and tear-proof.
First off I want to say that this isn't going to stay no
matter what. It's more of a water resistant look. If you
are going to be swimming for hours or crying nonstop,
then some of the color may fade or kind of shift around.
No makeup look is 100% water proof, it just resists 
and won't move around quite as much as other 
ways of wearing makeup.

Video:


Products Used:

Urban Decay - 
Naked 2 Palette

Maybelline - 
Color Tattoo: 
Tough as Taupe

Rimmel -
Match Perfection Concealer:
Fair/Light (230)

Flower Beauty -
Cream Blush:
Pure Petunia

Rimmel -
Kohl Pencil Eyeliner:
Black

Salon Perfect -
Brow Kit

Sally Hanson -
Eyelash Curler

L'Oreal -
Water-Proof Mascara:
Black

Rimmel -
Lipstick:
Airy Fairy

NYX -
Butter Gloss:
Vanilla Creme Pie

EYES:

Step One:
To prime the eyelid and give it a nice base for
the shadows that will go on top, I used this
Maybelline Color Tattoo in Tough as Taupe.
I used a clean finger to apply it all over my
eyelid and then used a stiff blending 
brush to help blend the color out.


Step Two:
Going to my Urban Decay Naked 2 palette, I 
used the color Tease and applied it all over 
the lid to set the cream eyeshadow base.
Tease is a matte grey taupe that is almost
the same exact color as the Maybelline
Color Tattoo that I used as a base.


Step Three:
Taking the light metallic silver called Verve, I 
applied it lightly to the ball of the lid and 
a bit into the inner corner.


Step Four:
Going in with a fluffy shader brush, I took this 
dark purply brown shade into the outer v and
through the crease to add some depth.


Step Five:
Next I first took the shade Foxy and put it in 
the inner corner and brow bone to lighten and 
then took the color Bootycall to highlight 
and add some shimmer.


Step Six:
To finish off the eyes, take a black kohl eyeliner
pencil and tight line your eyes. This is when you
put eyeliner on the waterline but on your upper
lash line. Then, curl your lashes and apply a few 
coats of your favorite waterproof mascara.


FACE:

Step One:
Since this look is sweat and tear resistant, we don't
want to cake on the face makeup. I myself have pretty
decent skin so I don't need much coverage. I just used
a concealer under the eyes and on any blemishes or
redness that I want to cover up. But, if you don't have
the best skin and need more coverage, I'd say go for
a BB or CC cream along with the concealer in problem
areas. It will give you the extra needed coverage, but
won't be quite as caky as a full on foundation. If you
have really oily skin I would suggest using a pressed
powder to set your makeup as well. I have pretty 
oily skin but skipped that step so I wouldn't 
have as much makeup on my face.


Step Two:
To add some color to the face I used this gorgeous
cream blush. Using all cream products will help your
 makeup stay all day. Powders fade and move around 
on your face more easily than a cream or liquid 
so keep that in mind.


Step Three:
To finish off and tie everything in together, fill
in the brows. If you've never done this before you'll
be surprised of the difference it makes. It really just
helps everything flow together and look polished off.
I use a combination of the two darkest colors since
I have naturally dark hair and eyebrows. To fill them
in I used the angle brush the kit comes with and then
brush them into place with the other end of the angled
brush. To set them in place, I used the wax stick.

More Pictures:


And That's It!
I really hope you enjoyed this and found it helpful.
If you have any suggestions, questions, or even just a 
something you want to tell me, let me know in the 
comments down below. Also, don't forget to follow my 
blog so that you can know when I have a new post up 
and share! It would mean the world to me if you do :)


xoxo,
Wren
Share
Tweet
Pin
Share
No comments
Older Posts

About Me

About Me
Just your average young adult trying to figure out life while taking all of you on the journey with me.

Followers

Follow With Bloglovin

Follow

Follow Me

  • 190 Subscribers
  • 7000 Followers
  • 95 Followers
  • 98 Followers
  • 15 Followers

Popular Posts

  • Lime Crime Giveaway! (Now Closed)
    a Rafflecopter giveaway Giveaway will close January 1, 2016 at 12am central time Rules: You MUST be 18 years of age or older OR h...
  • Where to get Lime Crime and Jefree Star Cosmetics Discounted?!
    Have you always wanted to try Lime Crime, Jeffree Star Cosmetics, Sugar Pill, Manic Panic, and so many more makeup brands but don't...
  • Dusty Road | Current Go To Makeup Look
    Above is my most recent YouTube video. I show you my most recent go to makeup look. It's super simple, easy, and modera...
  • Au Pairing | Traveling Abroad
    As I said in a couple post previous, I talked about studying abroad and trying to figure out what I want to do with my life. I've...
  • Gallbladder Surgery
    As I have previously mentioned, I took some time away from social media for my personal life but also because of my health. I'...

Blog Archive

  • ▼  2017 (9)
    • ▼  March (9)
      • Lazy Day | What I Ate Wednesday
      • Blog Schedule & Series
      • Future Blog & YouTube Plans
      • Beauty School Drop Out?
      • Gallbladder Surgery
      • Why I Took a Break
      • New Series! What It's Really Like...
      • Where I've Been
      • Rebranding Myself
  • ►  2016 (5)
    • ►  September (1)
    • ►  March (3)
    • ►  January (1)
  • ►  2015 (13)
    • ►  December (1)
    • ►  November (3)
    • ►  October (2)
    • ►  September (6)
    • ►  August (1)
  • ►  2014 (16)
    • ►  November (1)
    • ►  June (1)
    • ►  April (1)
    • ►  March (3)
    • ►  February (10)

Created with by ThemeXpose